* Please find English Version below *
Draußen pfeift der Wind und die Dämmerung taucht alles in ein diffuses Licht. Bald wird es dunkel. Mit jeder Minute wird es kälter und ungemütlicher. Macht aber nix, den drinnen prasselt ein gemütliches Holzfeuer, verbreitet eine wohlige Wärme und taucht den Raum in ein warmes Licht. Die Familie sitzt um den Ofen und der Blick in die Flammen wirkt einfach unglaublich beruhigend, während der Teekessel mit den ersten noch leisen Pfeiftönen auf sich aufmerksam macht …
Diese Szene ist für uns der Inbegriff von Gemütlichkeit, und genau das wünschen wir uns auch für unser Wohnmobil. Schon lange vor dem Start unserer großen Reise war dieses Bild in unseren Köpfen, leider fehlte vor unserem Aufbruch die Zeit. Während des letzten Winters 2021/22 in Griechenland und der Türkei haben wir einen solchen Holzofen aufgrund vieler kalter Nächte um den Gefrierpunkt schmerzlich vermisst. Unsere Truma Gasheizung hat zwar verlässlich ihren Dienst getan, ist eben aber nicht das Gleiche. Sie macht warm, verbraucht aber einiges an Propangas und erzeugt recht feuchte Raumluft.
Jetzt, beim Zwischenstopp in Deutschland im Sommer 2022 haben wir es endlich geschafft:
Unser Wohnmobil besitzt einen Holzofen.
Unsere Erfahrungen zu Planung, Kauf und Einbau im Wohnmobil möchten wir in diesem Artikel mit Dir teilen. Die hier aufgeführten Informationen erheben allerdings keinen Anspruch auf Vollständigkeit und Richtigkeit, sie bilden lediglich unseren Kenntnisstand nach bestem Wissen und Gewissen ab.
1. Warum ein Holzofen im Wohnmobil: Grundsätzliches
Der Einbau eines Holzofens ins Wohnmobil ist in vielen Fällen keine Notwendigkeit, sondern eher eine Herzensangelegenheit. Wer sich zum Einbau eines Mini Holzofens in den Van oder ins Wohnmobil entscheidet, sollte sich gut informieren und ist dann auch voll verantwortlich für den Einbau und den Betrieb.
Denn die am häufigsten gestellte Frage zu einem Holzofen im Van oder Wohnmobil ist meistens:
Ist der Einbau eines Holzofens im Camper zulässig?“
Die Antwort lautet klipp und klar: Jein!
Die vorgeschriebenen Abstände zu brennbaren Materialien sind in den meisten Wohnmobilen und Vans nicht einhaltbar, manchmal ändert sich durch die Rauchgasrohre sogar die eingetragene Fahrzeughöhe und die eigentlich notwendige Eintragung als Fahrzeugänderung ist quasi kaum zu bekommen. Da sich in Deutschland aber weder TÜV noch Schornsteinfeger zu 100% zuständig fühlen, ist man hier in einer Grauzone unterwegs…
Der Holzofen kann in vielen Fällen als Ladung deklariert werden, solange er nicht mit der Karosserie des Fahzeugs verschweißt (also dauerhaft und fest verbunden) ist.
Wie für jede andere Ladung (und jeder andere Einbau) auch ist es zwingend notwendig, für eine ausreichende Ladungssicherung zu sorgen. Außerdem muss darauf geachtet werden, dass das zulässige Gesamtgewicht des Fahrzeugs durch das Gewicht des Ofens nicht überschritten wird.
Fachmännisch eingebaut kann ein Holzofen die Abhängigkeit von Propan reduzieren, eine günstigere Art des Heizens im Wohnmobil darstellen und vor allem auch die Luftfeuchtigkeit im Inneren der fahrbaren Wohnung während der Heizperioden deutlich reduzieren. Denn beim Verbrennen von 1 kg Propan wird 1,6 kg Wasser als Kondensat erzeugt.
Dem gegenüber steht der beim Verbrennen von Holz entstehende Feinstaub, die Notwendigkeit, trockenes Holz mitzuführen oder zu beschaffen und der Umgang mit der oben beschriebene rechtliche Grauzone.
2. Welcher Ofen ist der Richtige?
Der Markt für kleine Holzöfen für Wohnmobile und Vans hält sich immer noch sehr in Grenzen. Denn selbst der kleinste konventionelle Holzofen ist viel zu groß dimensioniert und würde einen kleinen Raum wie ein Van oder ein Wohnmobil sofort überhitzen. An dieser Stelle wollen wir Dir drei Hersteller vorstellen (keine bezahlte Werbepartnerschaft).
Uns war bei der Auswahl unseres Ofens hauptsächlich der Hersteller Tiny Wood Stoves aus Idaho, USA bekannt. Die Firma wurde von Nick gegründet, der mit seiner Familie viele Jahre in einem Airstream Wohnwagen lebte und nach einer Alternative für die Gasheizung suchte. Nun bietet die Firma eine ganze Reihe von kleinen Öfen zwischen 3 kW und 5 kW Heizleistung an. Auch Installationsmaterial, Ersatzteile und Zubehör ist hier erhältlich. Optimal für Vans und Wohnmobile ist der Dwarf 3 kW LITE.
Außerdem war uns durch einige Blogs und YouTube Videos die kanadische Firma Cubic Wood Stoves bekannt. Der vielverkaufte Cubic Cub Mini Wood Stove wird in vielen Vans eingebaut, sieht toll aus und heizt bis zu 18 Quadratmeter große Räume.
Während unserer Reise trafen wir eine Familie, die in ihren Van einen Ofen der Firma Outbacker Stoves verbaut hatte. Die in Nottingham/UK ansässige Firma vertreibt Öfen und Zubehör, welches eigentlich für Canvas Zelte entwickelt wurde und besticht durch eine hervorragende, deutschsprachige Website und kostenlosen Versand in der EU.
Die Preise dieser Öfen variieren je nach Größe und Hersteller zwischen 245 Euro für den Outbacker Stove (mit Sekundärbelüftung), 340 Euro für den Cubic Cub Mini und 640 Euro für den kleinen Dwarf 3 kW LITE von Tiny Wood Stoves. In allen diesen Verkaufspreisen ist Installationsmaterial und eventuelles Zubehör nicht enthalten.
Unser Ansatz:
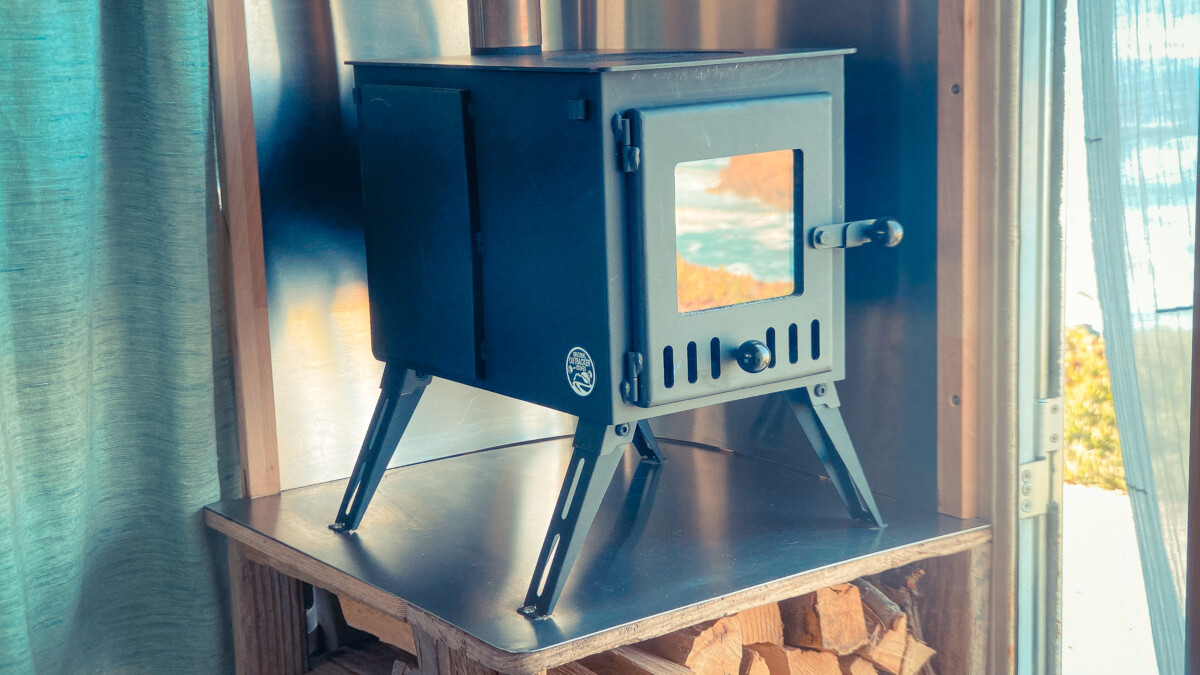
Da wir den letztgenannten Ofen in eingebautem Zustand erleben durften, dieser hervorragend bewertet wurde und der Verkaufspreis im Vergleich unschlagbar ist, haben wir uns für den Outbacker® ‚Firebox‘ Eco Burn mit Sekundärbelüftung entschieden.
3. Planung: Wo, wie und womit wird der Holzofen im Wohnmobil eingebaut
Frage 1: An welcher Position soll der Holzofen verbaut werden?
Bei der Planung der Einbauposition sind mehrere Dinge zu beachten. Zunächst sollte ein Ort gewählt werden, der möglichst zentral liegt. So kann die Wärme des Ofens mithilfe einer guten Luftzirkulation möglichst gleichmäßig die Wohnkabine beheizen. Bei ungünstiger Position können verschiedene Wärmezonen entstehen, so dass sich die Wärme nicht optimal im Raum verteilen kann.
Außerdem sollte die Einbauhöhe des Ofens möglichst tief eingebaut werden, da es sonst im Bereich der Füße empfindlich kalt sein kann (speziell bei schlecht isolierter Bodenplatte), während der obere Teil der Wohnkabine bereits brüllend heiß ist.
Unser Ansatz:
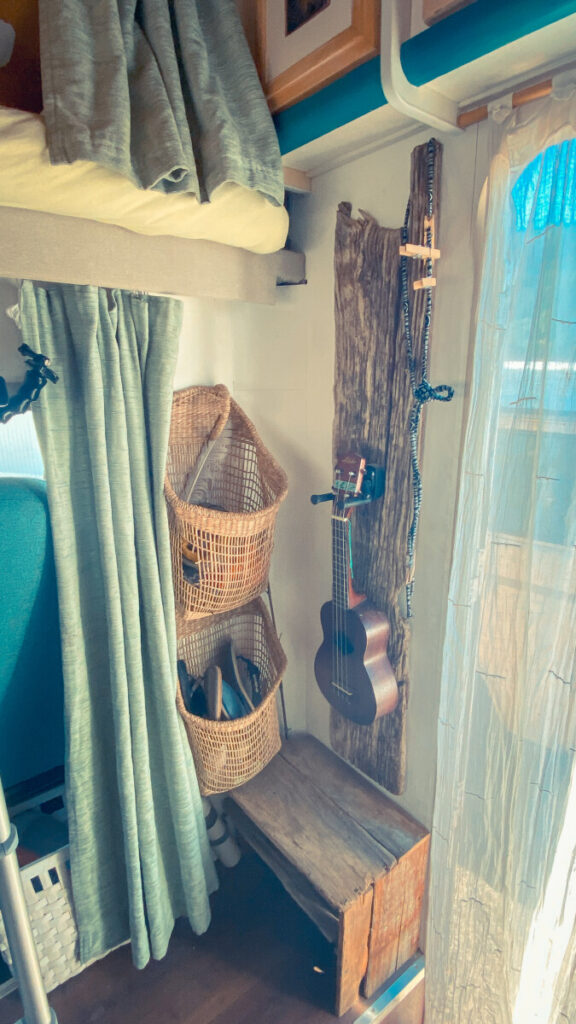
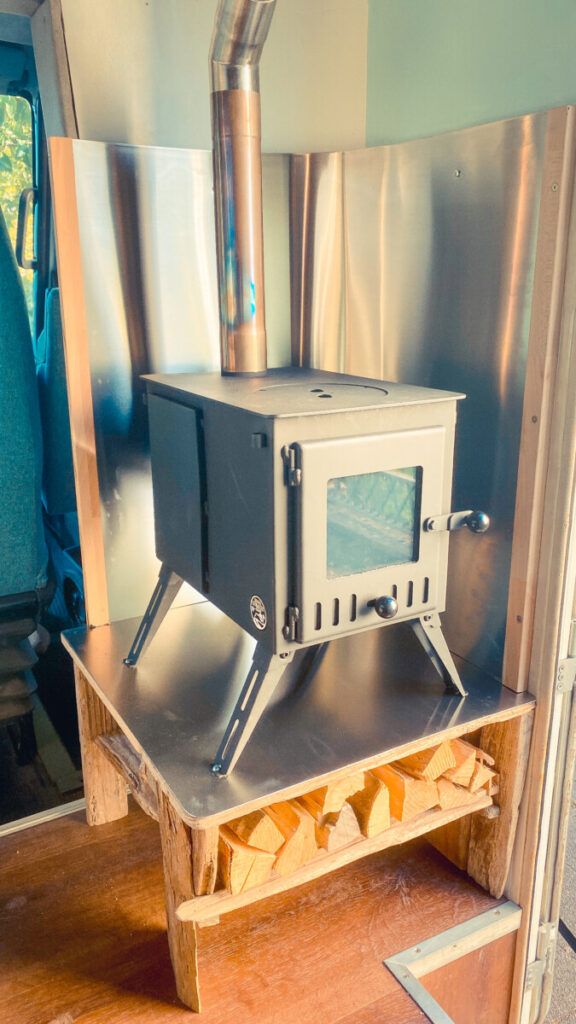
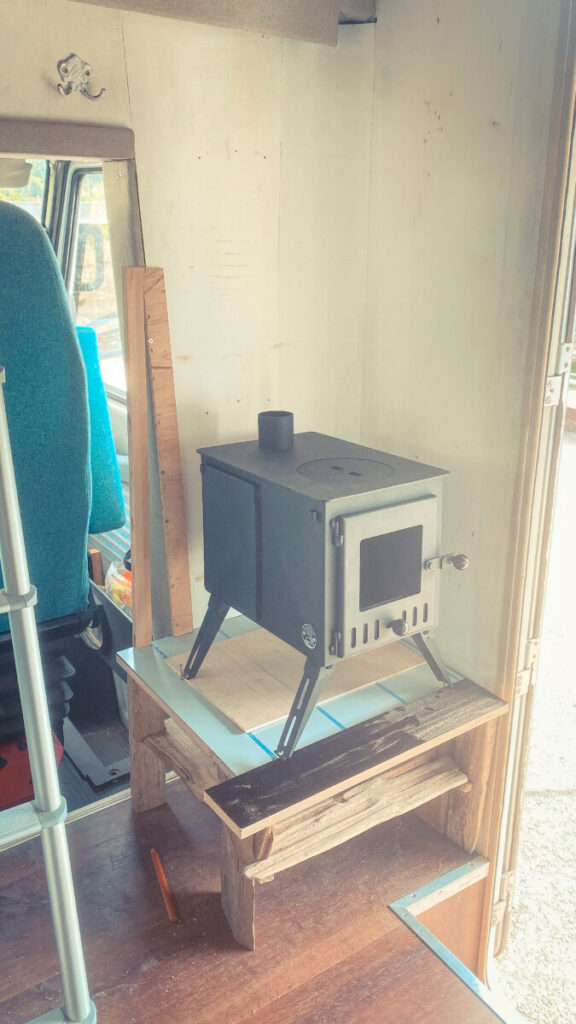
In unserem Fall war nur ein Einbau direkt neben der Eingangstür möglich. Das dort schon montierte Schuhregal aus Treibholz wurde vergrößert und stabilisiert. Der Ofen wurde auf diesem Regal montiert, wobei der Ofen sich damit ca. 40 Zentimeter über dem Fußboden befindet.
Frage 2: Woher kommt die Frischluft für den Ofen
Auch der kleinste Holzofen benötigt Frischluftzufuhr von außerhalb der kleinen Wohnkabine des Vans bzw. des Wohnmobils. Hierzu sind zwei Alternativen möglich:
1. Eine direkte externe Brennluftzufuhr zum Ofen, wobei eine Luftzuleitung Frischluft von draußen direkt in die Brennkammer des Ofens einleitet. Für die hier vorgestellten Alternativen ist diese Option leider meines Wissens nicht möglich.
2. Belüftung des Ofens durch die Raumluft der Kabine. Hierbei muss während des Betriebs des Holzofens genügend Luft von außen in die Kabine gelangen können.
Unser Ansatz:
Durch die Montage neben der Tür ist eine Frischluftzufuhr zur Kabine in unserem Fall leicht realisierbar. Außerdem ist ein Ventilator mit wählbarer Zu- oder Abluftbetrieb in der Decke über unserer Sitzecke montiert, der ebenfalls für ausreichende Zuluft sorgen kann. Und schließlich eignet sich das Küchenfenster als mögliche Zuluftquelle.
Frage 3: Wie befestige ich den Ofen im Wohnmobil
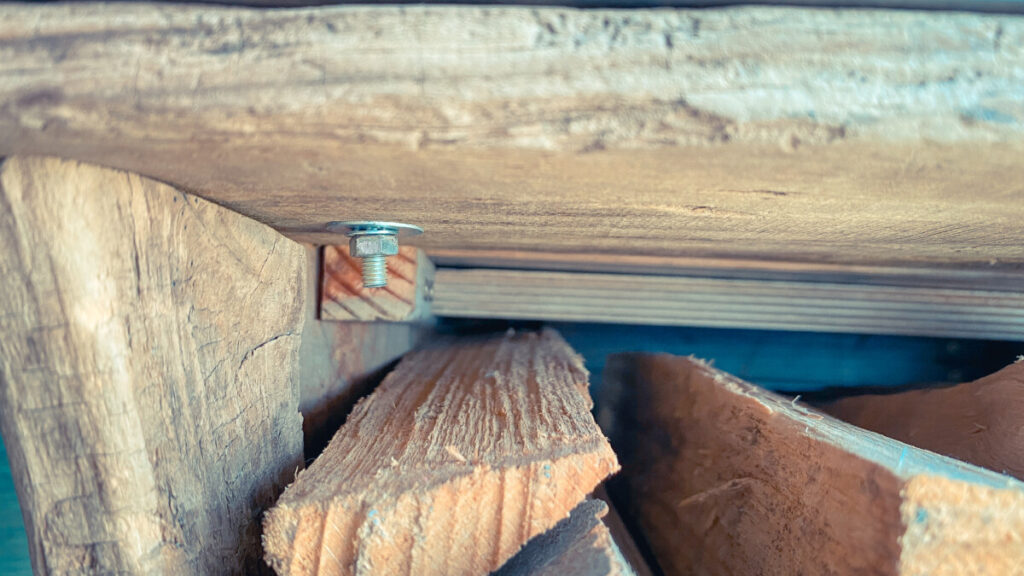
Eine sichere Verschraubung mit dem Untergrund des Ofens ist essentiell wichtig, denn diese Befestigung muss das Gewicht des Ofens auch im Falle einer Vollbremsung bzw. einer Kollision halten können. Wähle also besser eine zu feste Schraubverbindungen an dieser Stelle. Außerdem ist die Verbindung gegen ein selbstständiges Lösen der Schrauben durch Erschütterungen zu sichern. Achtung: Holzschrauben können durch diese Erschütterungen das Holz ausschlagen und sich somit lösen.
Unser Ansatz:
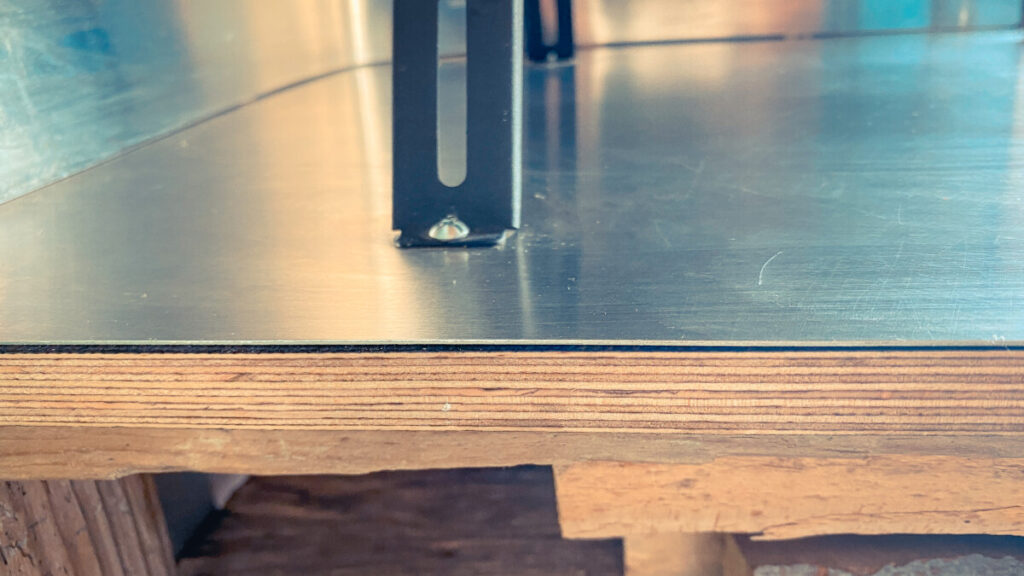
Wir haben die obere Platte des Schuhregals (welches die Basis für unseren Ofen bildet) mit einer soliden Siebdruckplatte erweitert und mit einer zusätzlichen Metallplatte gegen Hitzeabstrahlung geschützt. Zur Befestigung des Ofens wurden Metallschrauben zur Durchsteckmontage gewählt, welche auf der Unterseite der Siebdruckplatte mit Schraubenmuttern fest verschraubt, aber auch wieder lösbar sind. Durch die Verwendung von Fächerscheiben wird das Lösen der Schrauben durch Erschütterungen während der Fahrt verhindert.
4. Der Einbau des Ofens und die Dachdurchführung
Vor dem Einbau des neuen Ofens ins Wohnmobil sollte dieser mindestens einmal im Freien „eingebrannt“ werden, da die Beschichtung des Ofens beim erstmaligen Anfeuern sehr streng riecht und richtig dampft/raucht.
Für die Feinpositionierung des Ofens ist es unverzichtbar, die Positionierung der Rauchabzugsrohre und die Dach- oder Wanddurchführung festzulegen. Dann kann sowohl die Position des Ofens als auch die der Durchführung angezeichnet werden.
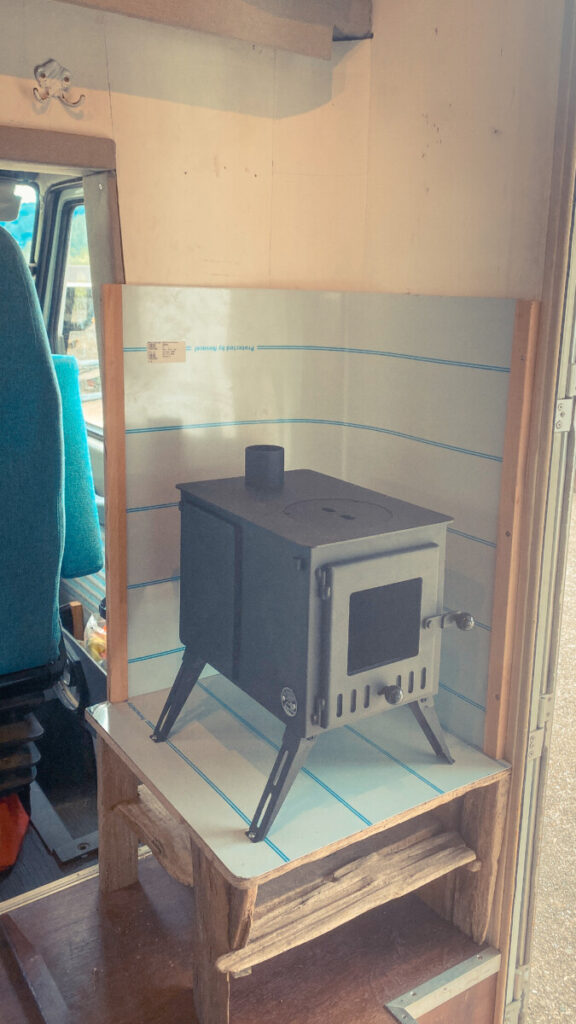
Vor dem finalen Einbau des Ofens und der Dachdurchführung sollte brennbares Material im Bereich des Ofens und unter dem Ofen durch solide Bleche geschützt werden, die so angebracht werden, dass dahinter Luft kühlend zirkulieren kann. Vorsicht: Auch das Rauchrohr kann vor allem im unteren Bereich noch sehr viel Hitze abstrahlen!
Die Dachdurchführung sollte wie auch die Befestigung des ganzen Ofens reversibel sein, um eine Eintragung einer Fahrzeugänderung zu vermeiden. Auch solltest Du darauf achten, dass die Abzugsverrohrung keine Höhenänderung des Fahrzeugs zur Folge hat, d.h. dass die Teile der Verrohrung, die während der Fahrt nicht abgebaut werden, nicht die eingetragene Fahrzeughöhe überschreiten.
Für die eigentliche Durchführung gibt es je nach Ofen und Durchmesser der Rauchabzugsrohre verschiedene Möglichkeiten: Aufsteckbare Lösungen, Teleskopkamin oder auch eine verschließbare Außenklappe sind je nach Ofen erhältlich.
Der wichtigste Punkt ist die Brandsicherheit der Dachdurchführung, insbesondere die Isolierung der Wohnkabine und die eigentliche Durchführung. Optimal ist, wenn im Bereich der Dachdurchführung mit einem doppelwandigen Abzugsrohr gearbeitet wird. So ist sichergestellt, dass die Außenseite des Rohres nicht heiß wird.
Unser Ansatz:
Sowohl unter dem Ofen als auch an Rück- und Seitenwand haben wir das Holz des Kabinenausbaus mit 1mm starkem Aluminiumblech verkleidet. Unter dem Ofen wurde das Blech mit feuerfestem Silikon direkt auf die Siebdruckplatte geklebt und zusätzlich verschraubt. Die Seitenverkleidungen wurden mit einem Abstand von 10mm zur Holzwand installiert, so dass hinter dem Metall Luft zirkulieren kann.
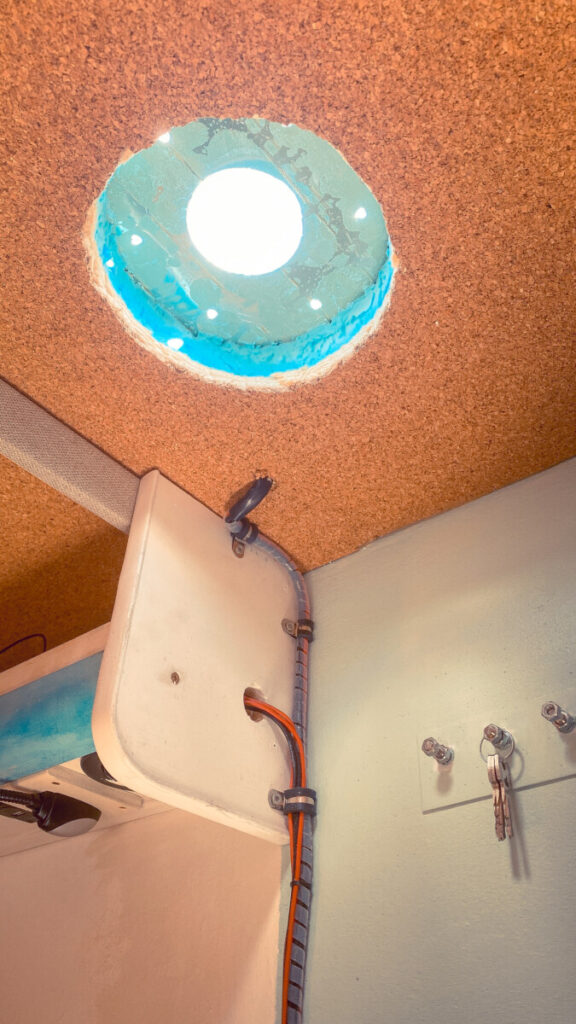
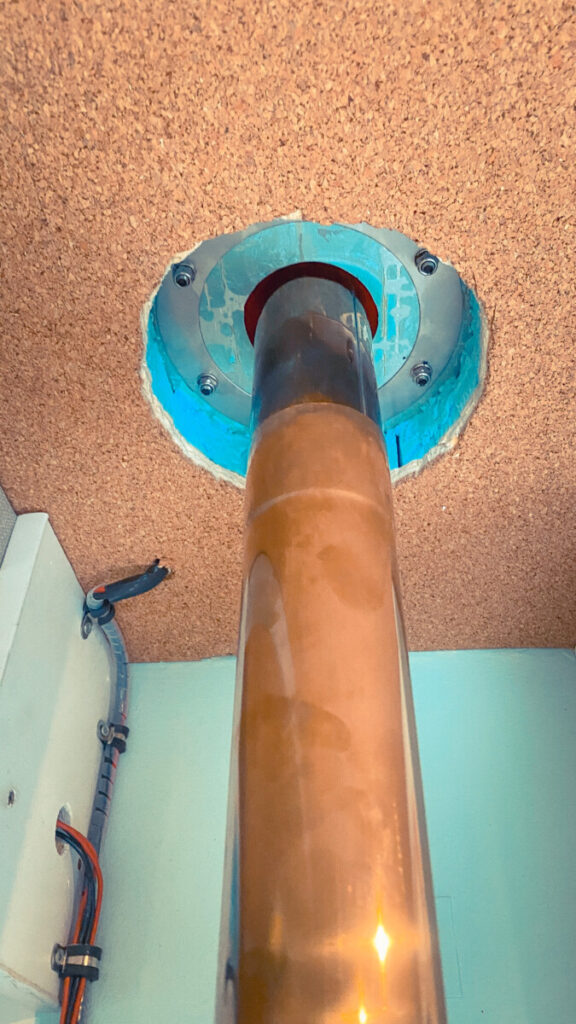
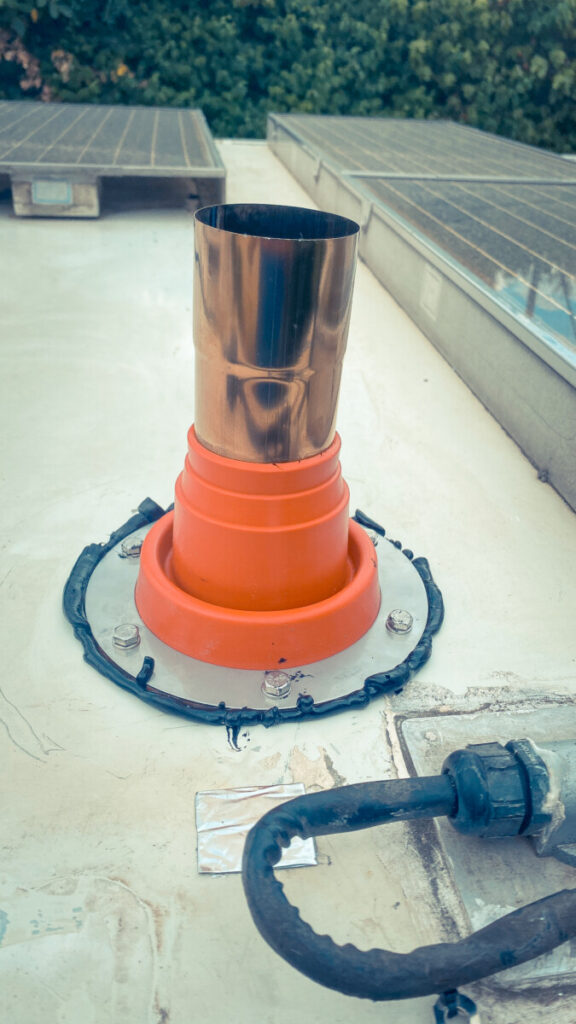
Bei der Dachdurchführung haben wir uns für die Verwendung der mitgelieferten, einwandigen Rauchabzugsrohre mit 600mm Durchmesser und außerdem für eine Silikonmanschette entschieden, welche als Zubehör zum Ofen bei Outbacker Stoves erhältlich und bis 300 Grad hitzebeständig ist. Diese wird mit hitzebeständigem Silikon (erhältlich in jedem Baumarkt) aufs Dach geklebt und mit 6 Edelstahl-Metallschrauben zur Durchsteckmontage befestigt, die auf der Innenseite mit Muttern und Unterlegscheiben verschraubt werden.
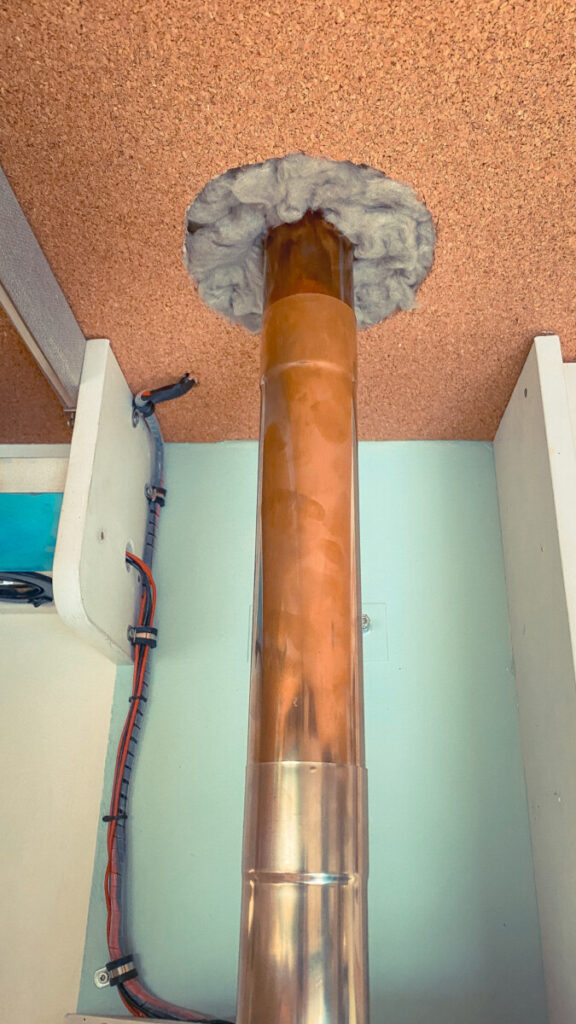
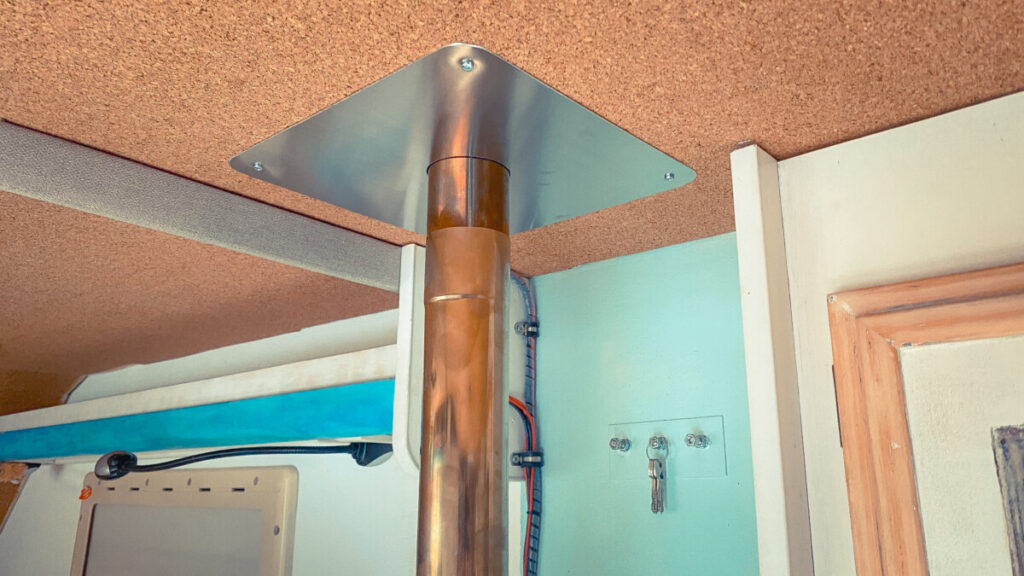
Die Isolierung der Wohnraumdecke haben wir um das Rohr herum weiträumig entfernt und den Hohlraum mit Steinwolle isoliert, die sogar bis 1.000 Grad hitzebeständig ist. Auf der Innenseite der Kabine wurde dann ein Aluminiumblech angebracht, um die Isolierung zu verkleiden.
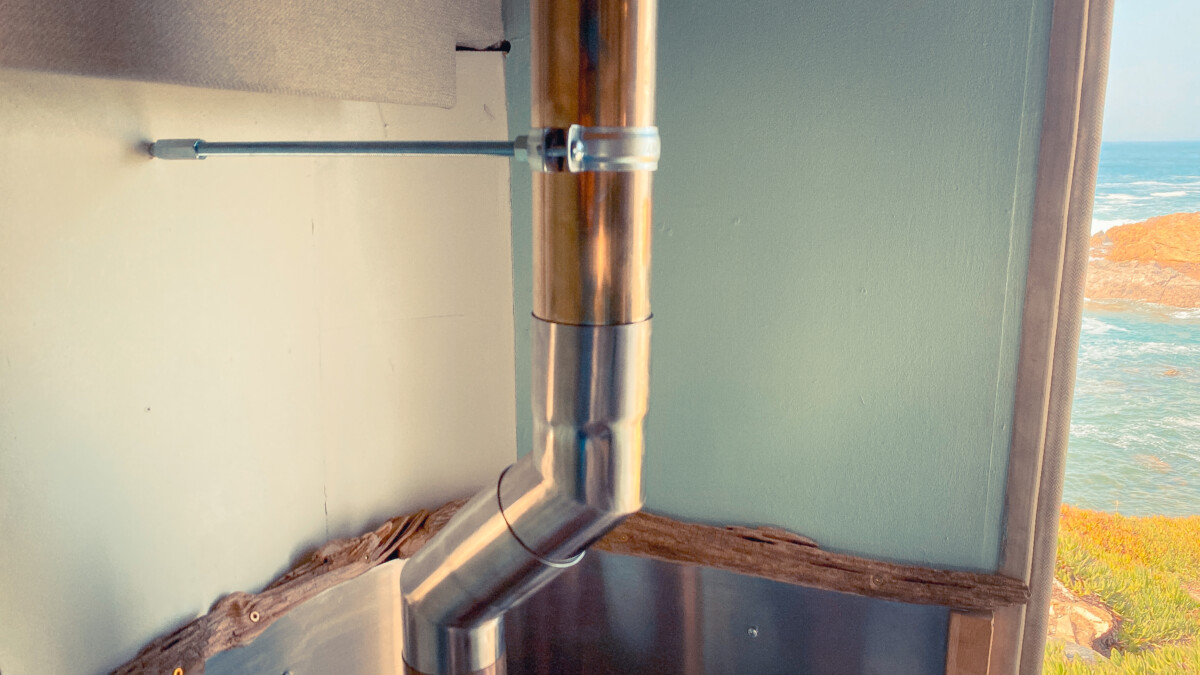
Zusätzlich wurden die Rauchabzugrohre mit Rohrschellen und Gewindestangen an zwei Wandseiten fixiert.
5. Sicherheit während des Betriebs
Bei allen romantischen Vorstellungen des knisternden Kaminfeuers im Wohnmobil oder Van steht die Sicherheit während des Betriebs an erster Stelle. Es gilt, das Risiko eines Brandes sowie einer Kohlenmonoxid- oder Rauchgasvergiftung soweit wie irgend möglich zu minimieren.
Hierzu sollte zunächst der Einbau sehr sorgfältig und unter Einhaltung aller Herstellerangaben des Ofens erfolgen. Außerdem sollte beim Betrieb eines Holzofens sowohl ein Kohlenmonoxid- sowie ein Rauchmelder verbaut sein. Dabei ist es wichtig, die Positionierung dieser Warneinrichtungen entsprechend der Herstellerangaben durchzuführen. Der Kohlenmonoxidmelder sollte beispielsweise auf einer Höhe von etwa 30 Zentimetern über dem Fußboden, der Rauchmelder an der Kabinendecke montiert werden.
6. Fazit
Der Einbau eines Holzofens ins Wohnmobil ist nicht mal eben so nebenbei erledigt. Jeder, der sich dazu entschließt, sollte sich darüber im Klaren sein, dass er sich und vor allem sein Fahrzeug in eine gesetzliche Grauzone begibt und sich im Vorfeld mit den Pro´s und Contra´s detailliert befassen.
Wenn dann die Montage gewissenhaft erledigt ist, die Sicherheitseinrichtungen gemäß der Vorgaben installiert sind und der Betrieb des Ofens verantwortungsvoll von Statten geht, steht vielen gemütlichen Abenden im fahrbaren Zuhause nichts mehr im Wege.
English Version:
Outside, the wind whistles and twilight bathes everything in a diffuse light. Soon it will be dark. With each minute it becomes colder and more uncomfortable. But that doesn’t matter, because inside a cozy wood fire is crackling, spreading a cozy warmth and bathing the room in a warm light. The family sits around the stove. Watching the flames is just incredibly soothing, while the tea kettle draws attention to itself with the first whistling sounds…
This scene is the epitome of coziness for us, and that’s exactly what we want for our camper. Long before the start of our great journey, this image was in our heads, unfortunately, before our departure, the time was missing. During the last winter 2021/22 in Greece and Turkey, we sorely missed such a wood stove due to many cold nights around freezing point. Our Truma gas heater has reliably done its job, but is just not the same. It heats the room, but consumes quite a bit of propane gas and produces humid indoor air.
Now, during our stopover in Germany in the summer of 2022, we finally got it:
Our motorhome has a wood-burning stove.
We would like to share our experiences with planning, buying and installing it in the motorhome with you in this article. However, the information listed here makes no claim to completeness and accuracy, they merely represent our state of knowledge to the best of our knowledge and belief.
1. Why a wood stove in a motorhome: Basics
The installation of a wood stove in the motorhome is in many cases not a necessity, but rather a matter of the heart. Who decides to install a mini wood stove in the van or in the motorhome, should be well informed and is then also fully responsible for the installation and operation.
Because the most frequently asked question about a wood stove in the van or camper is usually:
Is it permissible to install a wood stove?“
The answer is: Yes and No!
The prescribed distances to combustible materials are not possible in most motor homes and vans and the actually necessary registration as a vehicle modification is virtually impossible to obtain. Since neither German TÜV nor chimney sweep feel 100% responsible, one is here in a gray area…
A lot of times, the wood stove can be declared as a load, as long as it is not welded to the body of the vehicle (i.e. permanently and firmly connected).
Nevertheless, as for any other cargo (and any other installation), it is mandatory to ensure that the load is adequately secured. Care must also be taken to ensure that the weight of the stove does not add up to exceeding the gross vehicle weight rating.
And yet, a wood-burning stove can reduce dependence on propane, provide a less expensive way to heat a mobile home, and most importantly, significantly reduce humidity inside the mobile home during heating seasons. This is because burning 1 kg of propane produces 1.6 kg of water as condensate.
2. Which stove is the right one?
The market for small wood stoves for motorhomes and vans is still limited. This is because even the smallest conventional wood stove is far too large in size and would immediately overheat a small space like a van or camper. At this point we want to introduce you to three manufacturers.
We were mainly familiar with the manufacturer Tiny Wood Stoves from Idaho, USA when choosing our stove. The company was founded by Nick, who lived with his family in an Airstream trailer for many years and was looking for an alternative to gas heating. Now the company offers a whole range of small stoves between 3 kW and 5 kW heating power. Installation material, spare parts and accessories are also available here. Optimal for vans and motorhomes is the Dwarf 3 kW LITE.
We were also aware of the Canadian company Cubic Wood Stoves through some blogs and YouTube videos. The much sold Cubic Cub Mini Wood Stove is installed in many vans, looks great and heats up to 18 square meters.
During our trip, we met a family who had installed a stove from Outbacker Stoves in their van. Based in Nottingham/UK, the company sells stoves and accessories that were actually designed for canvas tents and boasts an excellent German-language website and free shipping in the EU.
Prices of these stoves vary by size and manufacturer from 245 Euros for the Outbacker Stove (with secondary ventilation), 340 Euros for the Cubic Cub Mini, and 640 Euros for the small Dwarf 3 kW LITE from Tiny Wood Stoves. All of these retail prices do not include installation materials and any accessories.
Our approach:
Since we were able to experience the latter stove in installed condition, it received excellent reviews, and the retail price is unbeatable in comparison, we decided to go with the Outbacker® ‚Firebox‘ Eco Burn.
3. Planning: Where, how and with what the wood stove will be installed in the motor home
Question 1: Where should the wood stove be installed?
There are several things to consider when planning the installation position. First, a location should be chosen that is as central as possible. This way, the heat from the stove can heat the living cabin as evenly as possible with the help of good air circulation. An unfavorable position can result in different heat zones, i.e. the heat cannot be optimally distributed in the room.
In addition, the installation height of the stove should be as low as possible, otherwise it can be sensitively cold in the area of the feet (especially with a poorly insulated floor plate), while the upper part of the living cabin is already roaring hot.
Our approach:
In our case, only installation right next to the entrance door was possible. The shoe rack made of drift wood which was already mounted there was enlarged and stabilized. The oven was mounted on this shelf, with the oven mounted only about 40 centimeters above the floor.
Question 2: Where does the fresh air for the stove come from?
Even the smallest wood stove needs fresh air supply from outside the small living cabin of the van or camper. Two alternatives are possible for this:
- A direct external combustion air supply to the stove, where an air supply line introduces fresh air from outside directly into the stove’s combustion chamber. Unfortunately, to my knowledge, this option is not possible for the alternatives presented here.
- Ventilation by the room air of the cabin. Here, sufficient air must be able to enter the cabin from the outside while the wood stove is in operation.
Our approach:
By mounting it next to the door, a fresh air supply to the cabin is easily feasible in our case. In addition, a fan with selectable supply or exhaust mode is mounted in the ceiling above our sitting area, which can also provide sufficient supply air. And finally, the kitchen window is a suitable option for us.
Question 3: How do I fix the stove in the motor home?
A secure screw connection to the base of the stove is essential, because this attachment must be able to hold the weight of the stove even in the event of a full stop or collision. It is therefore better to choose a screw connection that is too tight at this point. In addition, the connection must be secured against independent loosening of the screws due to vibrations. Caution: Wood screws can damage the wood due to these vibrations and thus loosen.
Our approach:
We built the top of the shoe rack (which forms the base for our stove) with a solid screen printing plate and protected it from heat radiation with an additional metal plate. Metal screws for through-hole mounting were chosen to secure the stove, which are screwed tightly to the underside of the screen printing plate with nuts, but can also be loosened again. The use of serrated lock washers prevents the screws from loosening due to vibrations during driving.
4. Installation of the oven & roof penetration
Before installing the new stove in the motorhome, it should be „burned in“ at least once in the open air, because the coating of the stove smells very strong when it is fired up for the first time and really steams/smokes.
For the fine positioning of the stove, it is indispensable to determine the positioning of the flue pipes and the roof or wall penetration. Then both the position of the stove and the feedthrough can be marked.
Before the final installation of the stove and the roof duct, combustible material in the area of the stove and under the stove should be protected by solid metal sheets, which are placed so that air can circulate behind them. Caution: Even the flue pipe can still radiate a lot of heat, especially in the lower area!
The roof duct should be reversible, as well as the mounting of the whole stove, to avoid registration of a vehicle modification. You should also make sure that the exhaust piping does not result in a change in the height of the vehicle, i.e. that the parts of the piping that are not removed while driving do not exceed the registered vehicle height.
There are various options for the actual ductwork, depending on the stove, the furnace and the diameter of the flue pipes: Slip-on solutions, telescopic flue or even a closable external flap are available.
The most important point is the fire safety of the roof duct, especially the insulation of the living cabin and the actual duct. It is optimal to work with a double-walled exhaust pipe in the area of the roof duct. This ensures that the outside of the pipe does not get hot.
Our approach:
Both under the stove and on the rear and side walls, we clad the wood of the cabin extension with 1mm thick aluminum sheet. Under the stove, the sheet was glued directly to the silk screen with fireproof silicone and also screwed. The side panels were installed with a distance of 10mm to the wooden wall, so that air can circulate behind the metal.
For the roof penetration, we opted to use the supplied 600mm diameter single wall flue pipes and also a silicone sleeve which is available as an accessory to the stove from Outbacker Stoves and is heat resistant up to 300 degrees Celsius. This is glued to the roof with heat resistant silicone (available at any hardware store) and secured with 6 stainless steel metal screws for through-hole installation, fastened on the inside with nuts and washers.
We removed a lot of the insulation from the living room ceiling around the pipe and insulated the cavity with rock wool, which is heat resistant even to 1,000 degrees Celsius. An aluminum sheet was then installed on the inside of the cabin to cover the insulation.
In addition, the smoke exhaust pipes were fixed to two sides of the wall with pipe clamps and threaded rods.
5. Safety during operation
For all the romantic notions of the crackling fireplace in the RV or van, safety during operation is paramount. It is important to minimize the risk of fire and carbon monoxide or smoke poisoning as much as possible.
To do this, first of all, the installation should be done very carefully and in compliance with all the manufacturer’s installation instructions. In addition, when operating a wood stove, both a carbon monoxide and a smoke detector should be installed. It is important to position these warning devices according to the manufacturer’s instructions. For example, the carbon monoxide detector should be installed at a height of about 30 centimeters above the floor, and the smoke detector should be installed on the ceiling of the cabin.
6. Conclusion
Installing a wood-burning stove in a mobile home is not something that should be done lightly. Anyone who decides to do so should be aware that he and, above all, his vehicle are entering a legally gray area and should deal in detail with the pros and cons in advance.
If the installation is then done conscientiously, the safety devices are installed in accordance with the specifications and the operation is done with caution, many cozy evenings in the mobile home can follow.

